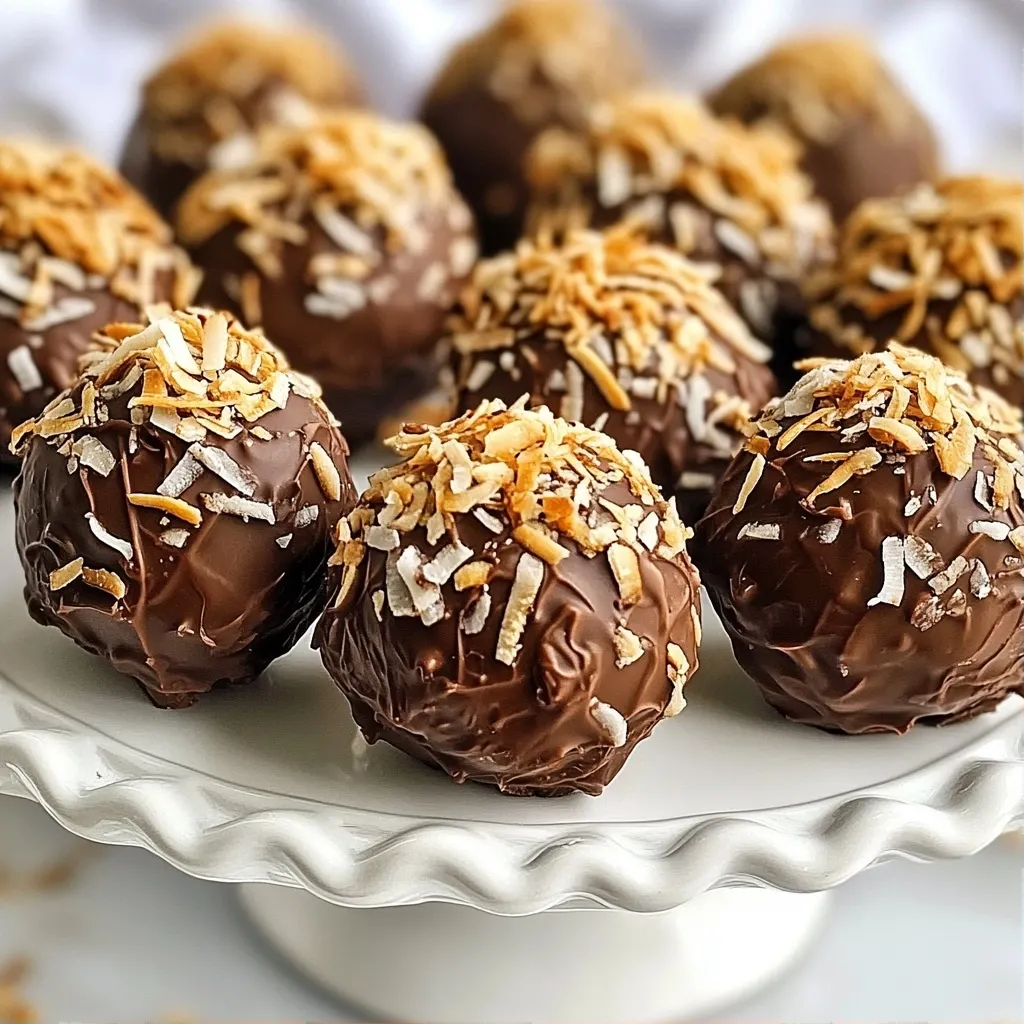
Are you ready to indulge in a dessert that requires no oven at all? These No Bake Chocolate Coconut Truffle Balls are the perfect treat for chocolate lovers like you. They’re easy to make and oh-so-delicious. With just a handful of simple ingredients, you can whip up a batch that will satisfy any sweet tooth. Join me as I share the secrets to this dreamy delight!
Why I Love This Recipe
- Delicious Flavor Combination: The rich chocolate and tropical coconut create a perfect harmony of flavors that is irresistible.
- Easy to Make: This recipe requires minimal ingredients and can be prepared quickly, making it perfect for any occasion.
- Healthier Treat Option: With almond flour and natural sweeteners, these truffles are a guilt-free indulgence that satisfies your sweet tooth.
- Customizable: Feel free to add nuts, dried fruits, or different coatings to personalize these truffles to your taste.
Ingredients
List of Ingredients for Chocolate Coconut Truffle Balls
- 1 cup unsweetened shredded coconut (plus extra for rolling)
- 1 cup almond flour
- 1/2 cup cocoa powder
- 1/3 cup maple syrup
- 1 teaspoon vanilla extract
- 1/4 teaspoon salt
- 1/2 cup dark chocolate chips (dairy-free if desired)
- 1 tablespoon coconut oil
Substitute Options for Key Ingredients
If you need to swap some ingredients, here are great options:
- Almond flour: Use oat flour or coconut flour if needed.
- Maple syrup: Honey or agave syrup works well too.
- Dark chocolate chips: Try semi-sweet chocolate or carob chips for a different taste.
- Coconut oil: You can use vegetable oil or butter instead.
Nutritional Information per Serving
Each serving has about:
- Calories: 150
- Total Fat: 10g
- Saturated Fat: 6g
- Carbohydrates: 14g
- Fiber: 3g
- Sugars: 5g
- Protein: 2g
These truffles are a tasty treat, packed with nutrients. Enjoy them guilt-free!
Step-by-Step Instructions
Mixing the Base Ingredients
Start by gathering your ingredients. In a large bowl, add 1 cup of shredded coconut, 1 cup of almond flour, and 1/2 cup of cocoa powder. Then, pour in 1/3 cup of maple syrup and add 1 teaspoon of vanilla extract. Don't forget to sprinkle in 1/4 teaspoon of salt. Mix all these ingredients well. Use your hands to combine everything until the mixture sticks together. This base is rich and tasty.
Forming the Truffles
Now it's time to shape the mixture. Take a small amount of the mixture and roll it into a ball, about 1 inch wide. Repeat this step until you form all the truffles. Place each ball on a parchment-lined baking sheet. This step is fun and messy! You will end up with about 12 truffles.
Melting and Coating with Chocolate
Next, let’s prepare the chocolate coating. In a microwave-safe bowl, add 1/2 cup of dark chocolate chips and 1 tablespoon of coconut oil. Microwave for about 30 seconds. Stir until the chocolate is smooth. If you prefer, you can use a double boiler to melt the chocolate. Once melted, dip each truffle ball into the chocolate. Make sure each ball is fully coated. Use a fork to lift it out, gently tapping off any extra chocolate. For a nice touch, roll the truffles in extra shredded coconut before placing them back on the parchment sheet. Finally, refrigerate the truffles for at least 30 minutes to set the chocolate.
Tips & Tricks
Techniques for Perfectly Coated Truffles
To coat your truffles well, start with dry hands. Moisture can make the chocolate seize up. Use a fork to dip each ball into melted chocolate. This method helps to cover every side evenly. After dipping, gently tap the fork on the bowl's edge. This step removes extra chocolate, creating a smooth finish. To keep your hands clean, you can use a toothpick to help with dipping.
Common Mistakes to Avoid
One key mistake is not letting the chocolate cool enough before dipping. If it's too hot, it will melt the truffle. Another mistake is not rolling the truffles evenly. Uneven sizes can lead to inconsistent texture. Lastly, don’t skip chilling the truffles after coating. Chilling helps the chocolate harden, giving a nice snap when you bite into them.
How to Achieve the Best Texture
For a creamy texture, use room temperature ingredients. This helps the mixture blend well. When mixing, don’t overwork the dough. Overmixing can make the truffles tough. If you want a softer truffle, add a splash of almond milk to the mix. For a firmer truffle, chill the mixture for about 10 minutes before forming the balls. This step makes shaping easier and keeps them round.
Pro Tips
- Chill Your Mixture: Refrigerate the truffle mixture for about 10 minutes before rolling. This makes it easier to form into balls and helps them keep their shape during coating.
- Use Quality Chocolate: Opt for high-quality dark chocolate for dipping. It enhances the flavor and provides a smoother coating that hardens well.
- Experiment with Flavors: Feel free to add a pinch of cinnamon or a few drops of peppermint extract to the mixture for a unique flavor twist.
- Store Properly: Keep the truffles in an airtight container in the refrigerator. They can last up to a week, but they are best enjoyed fresh!
Variations
Different Coatings for Truffles
You can change the look and taste of your truffles with different coatings. Try rolling them in crushed nuts, like almonds or pecans. You can also use cocoa powder for a rich taste. Sprinkles add fun colors. You could even coat them in crushed cookies! Each choice gives a new flavor and texture.
Flavor Variations
Want to mix things up? You can add nuts or seeds to your truffle mix. Walnuts or hazelnuts work well. If you like a hint of spice, try adding a drop of peppermint or almond oil. These flavors enhance the taste and make your truffles unique. You can also add dried fruit for a sweet twist!
Vegan and Gluten-Free Options
These truffles are already vegan and gluten-free, which makes them great for many diets. Use maple syrup to keep it sweet and natural. Make sure to choose dairy-free chocolate chips for a fully vegan option. Almond flour is a good base, and it is gluten-free. You can enjoy these truffles without worry!
Storage Info
Best Way to Store Chocolate Coconut Truffle Balls
To keep your chocolate coconut truffle balls fresh, store them in an airtight container. This helps prevent them from drying out. Place parchment paper between layers if you stack them. Keep the container in the fridge. This keeps the truffles cool and firm.
Shelf Life and Freezing Tips
These truffles stay fresh for about one week in the fridge. If you want to keep them longer, you can freeze them. Place the truffles in a single layer on a baking sheet. Freeze until solid, then transfer to a freezer-safe bag. They can last for up to three months in the freezer.
How to Rejuvenate Stale Truffles
If your truffles become stale, don’t worry! You can bring back some of their moisture. Place them in a sealed container with a slice of bread for a few hours. The bread adds moisture back into the truffles. Afterward, roll them in some fresh shredded coconut for added texture.
FAQs
How long can I keep no-bake chocolate coconut truffles?
You can keep no-bake chocolate coconut truffles in the fridge for up to two weeks. They taste best fresh, but they hold up well. Storing them in an airtight container helps keep them tasty. If you want to enjoy them longer, you can freeze them. Just make sure to wrap each truffle well. They can last up to three months in the freezer.
Can I use milk chocolate instead of dark chocolate?
Yes, you can use milk chocolate instead of dark chocolate. Milk chocolate will make your truffles sweeter and creamier. If you prefer a less sweet taste, stick to dark chocolate. The choice really depends on your taste. You can also try a mix of both for a fun twist!
What are other ingredients I can add for enhanced flavor?
Feel free to get creative! Here are some ideas to add more flavor:
- Nuts: Chopped almonds or walnuts add crunch.
- Spices: A pinch of cinnamon or nutmeg gives warmth.
- Extracts: Try almond or peppermint extract for a twist.
- Dried fruit: Chopped dates or cranberries add sweetness and texture.
Adding these ingredients can make your truffles even more unique and delicious!
Making chocolate coconut truffle balls is easy and fun. We covered the key ingredients, easy steps, and tips for success. You learned about variations and storage to keep them fresh.
These tasty treats can fit your taste and diet. I hope you feel ready to whip up your own batch. Enjoy creating and sharing delicious truffles with family and friends!