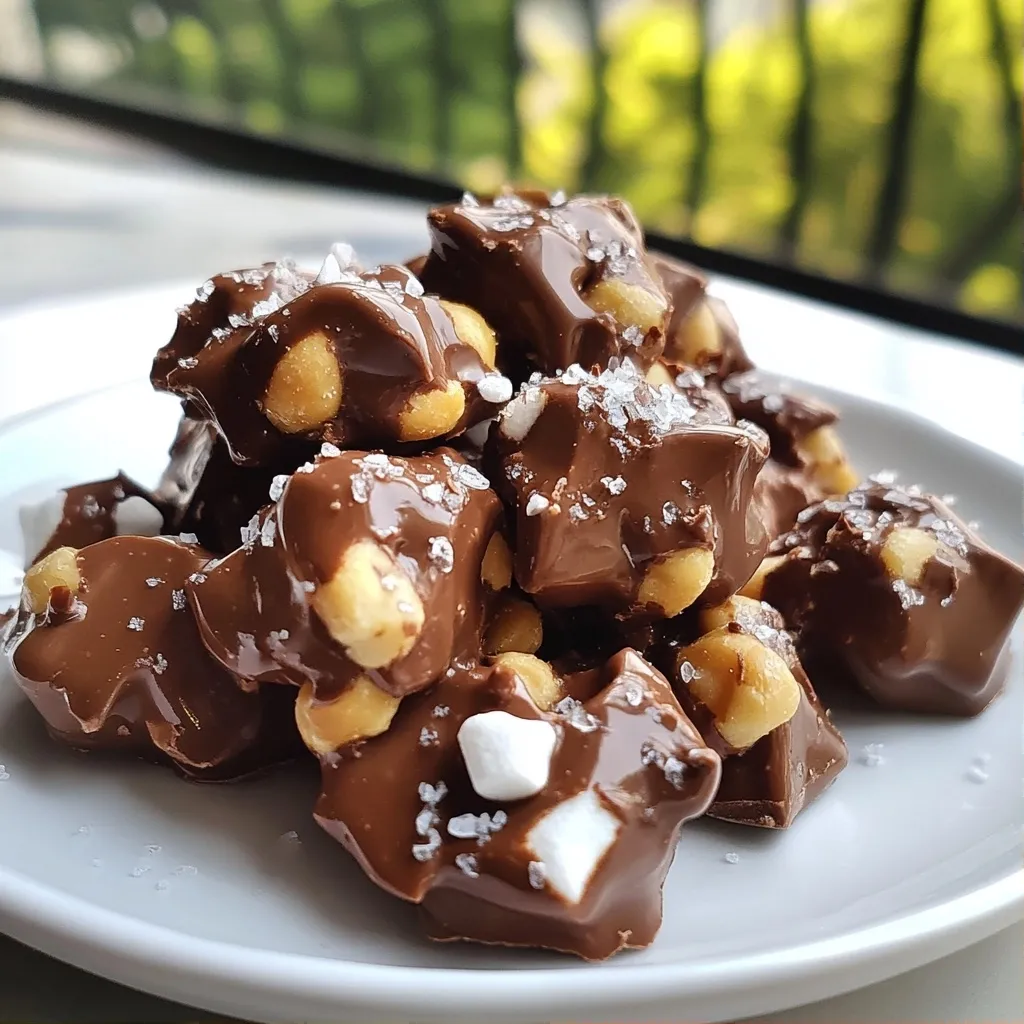
Indulge your sweet tooth with my easy and tasty No Bake Desserts Chocolate Peanut Clusters! These delightful treats blend rich chocolate, crunchy peanuts, and creamy peanut butter into bite-sized bites of joy. Perfect for anyone who craves a quick dessert without the hassle of baking, these clusters are a simple way to impress friends and family. Ready to make a batch? Let's dive into the delicious details!
Why I Love This Recipe
- Easy to Make: This recipe requires no baking, making it a quick and simple treat to whip up in no time.
- Irresistible Flavor: The combination of chocolate and peanut butter is a classic favorite that never disappoints.
- Customizable: You can easily add your favorite ingredients, like dried fruit or different nuts, for a unique twist.
- Perfect for Sharing: These clusters are great for parties, gatherings, or as a homemade gift for friends and family.
Ingredients
Main Ingredients
- Chocolate Chips: I use 2 cups of semi-sweet chocolate chips. They melt well and add rich flavor. You can also use dark chocolate for a stronger taste or milk chocolate for sweetness.
- Roasted Peanuts: One cup of roasted peanuts gives a nice crunch. You can choose salted or unsalted peanuts based on your taste. They balance the sweetness of the chocolate.
- Crunchy Peanut Butter: One cup of crunchy peanut butter is key. It adds creaminess and texture. The bits of peanuts enhance the clusters, making each bite exciting.
Optional Ingredients
- Mini Marshmallows: Adding 1 cup of mini marshmallows gives a fun texture. They become soft and chewy in the mixture. This change adds a nice surprise in each cluster.
- Sea Salt: Sprinkling a pinch of sea salt on top is optional. It enhances the flavor and creates a sweet-salty combo. This little touch makes the clusters even more delicious.
Step-by-Step Instructions
Melting the Chocolate and Peanut Butter
To begin, you will need a microwave-safe bowl. Combine 2 cups of semi-sweet chocolate chips with 1 cup of crunchy peanut butter. Heat the bowl in the microwave. Use 30-second intervals for heating. After each interval, stir the mixture. This stirring helps it melt evenly and prevents scorching. If it gets too hot or scorched, the chocolate may not melt well.
Mixing Ingredients
Once your chocolate and peanut butter mix is smooth, add 1 teaspoon of vanilla extract. Stir it in well. Now, fold in 1 cup of roasted peanuts and 1 cup of mini marshmallows. Make sure every peanut and marshmallow gets a good coat of the chocolate-peanut mix. This will give each bite a nice texture and flavor.
Shaping the Clusters
Get a baking sheet lined with parchment paper. Using a cookie scoop or a spoon, drop heaping spoonfuls of the mixture onto the sheet. Make sure to space them about 2 inches apart. This spacing is key. It allows the clusters to set properly without sticking to each other. After shaping, if you like, sprinkle a little sea salt on top for a sweet-salty taste.
Tips & Tricks
Perfecting Texture
To get the right texture for your chocolate peanut clusters, focus on melting the chocolate and peanut butter evenly. Stir the mixture well after each 30-second heating. This step helps avoid any burning. The final mix should be smooth and glossy.
Cooling time is key. After you scoop the clusters, let them chill in the fridge for at least 30 minutes. This time allows them to firm up nicely. If you skip this step, they may stay too soft and fall apart.
Make-Ahead Tips
You can make these clusters in advance, perfect for busy days. Simply prepare the clusters, then place them in an airtight container. They stay fresh in the fridge for up to a week.
Freezing is also an option. Wrap the clusters tightly in plastic wrap, then place them in a freezer-safe bag. They can last for up to three months. Just remember to let them thaw in the fridge before serving.
Serving Suggestions
When it comes to serving, presentation counts! Arrange the clusters on a colorful plate or tiered stand. This adds a fun touch to the table.
For drinks, pair these delicious bites with cold milk or creamy coffee. You can also enjoy them with a scoop of vanilla ice cream for a sweet treat. These simple ideas will elevate your dessert experience!
Pro Tips
- Use Quality Chocolate: Opt for high-quality semi-sweet chocolate chips for a richer flavor and smoother texture in your clusters.
- Customize Your Nuts: Experiment with different nuts like almonds or cashews for a unique twist on the classic peanut cluster.
- Chill for Perfect Texture: Allow the clusters to chill completely in the refrigerator to ensure they hold their shape when serving.
- Make It Festive: Add festive sprinkles or colored chocolate bits for special occasions to make your clusters visually appealing.
Variations
Flavor Enhancements
You can make these chocolate peanut clusters even better. Try adding other nuts or dried fruits. Almonds, walnuts, or cashews add crunch and taste. Dried cranberries or cherries give a nice sweet touch.
Switching up the chocolate is fun too. Dark chocolate brings a rich flavor, while white chocolate adds sweetness. Each choice changes the taste, so feel free to experiment!
Dietary Adjustments
If you want to make these clusters gluten-free, choose gluten-free mini marshmallows. For a vegan option, use dairy-free chocolate chips and a plant-based peanut butter. These swaps keep the treat tasty and friendly for all diets.
For low-sugar options, use sugar-free chocolate chips. You can also cut back on the marshmallows. These changes can help you enjoy the dessert while watching sugar intake.
Seasonal Additions
Adding seasonal ingredients can make your clusters festive. For fall, try adding pumpkin spice or a sprinkle of cinnamon. Around the holidays, you can mix in crushed peppermint for a fresh flavor.
Themed variations can also be fun. For birthdays, use bright sprinkles on top. For Halloween, add candy corn or Halloween-themed chocolates. Each season brings a chance to create something special!
Storage Info
Best Storage Practices
To keep your chocolate peanut clusters fresh, use an airtight container. This will protect them from air and moisture. Place a piece of parchment paper between layers if needed. This helps avoid sticking. Store them in a cool, dry place or in the fridge. Avoid leaving them out in warm areas as heat can melt the chocolate.
Shelf Life
These clusters last about a week in the fridge. You can enjoy them cold, or let them warm up a bit before eating. If you want to store them longer, freezing is an option. They can last up to three months in the freezer. Just make sure to wrap them well to prevent freezer burn. When ready to eat, let them thaw in the fridge. This keeps their texture just right.
FAQs
Can I use different types of nuts?
Yes, you can use many types of nuts. Almonds, cashews, or walnuts work great. Each nut offers a unique taste. For example, almonds add a nice crunch. Cashews bring a creamy texture. Walnuts give a rich flavor. Mix and match to find your favorite combo. Just remember, roasting the nuts enhances their flavor.
How do I avoid the chocolate seizing up?
To keep chocolate smooth, watch the heat. Use low heat and stir often. If chocolate gets too hot, it can clump. Stop heating as soon as it melts. Heat in short bursts, like 30 seconds. This helps control the temperature. Adding a bit of oil can help too. It keeps the chocolate nice and creamy.
What if I don’t have a microwave?
If you lack a microwave, use a double boiler. Fill a pot with water and bring it to a simmer. Place a heat-safe bowl on top. Add chocolate and peanut butter to the bowl. Stir gently until melted. This method allows for precise heating. You can also use a slow cooker or a saucepan, just keep stirring.
This blog post covered everything you need to make delicious clusters. You learned about key ingredients like chocolate chips, roasted peanuts, and crunchy peanut butter. I shared step-by-step instructions for melting the chocolate, mixing ingredients, and shaping the clusters. You also got tips on perfecting the texture and serving ideas to wow your friends. Remember, you can adjust flavors and dietary needs for everyone. With proper storage, you can keep your treats fresh for longer. Enjoy your cooking adventure and let your creativity shine with these tasty clusters!